2. Compilation & Modularity #
2.1 Compilation #
Compilation is the process of turning source files into binary files. This is (roughly) a two-step process:
- The compiler turns code into hardware-specific machine instructions (called assembly). The output of the compilation phase is usually an .o file (object file). The object file also contains symbols, these can be thought of as labels for the functions and variables that are compiled into the object.
- The linker takes all object files, and combines these together into an executable. In Windows these have .exe as extension, in Linux/Unix these are extensionless. The linker also takes libraries, explained in the next section.
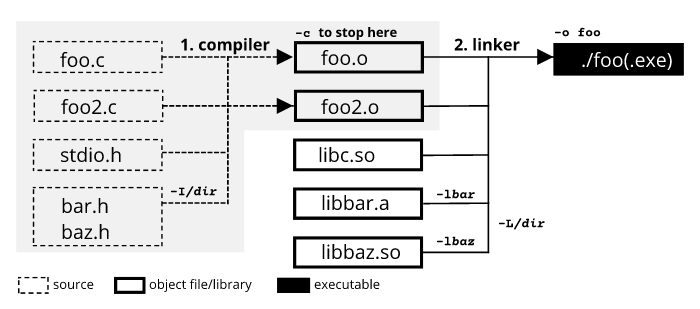
Compiling and linking are often executed in one command. The example above compiles foo.c and foo2.c into foo and, uses two libraries. Functionality from the C standard library is found automatically. The compiler knows where to find stdio.h/stdlib.h/…, and the linker knows where to find the associated libc.so. Without libraries, the compilation command is:
gcc foo.c foo2.c -o foo
More options
Compilers (gcc/cc for C programs, g++/c++ for C++ programs) take the following options:
-oOutput name of the executable. If not specified this will default toa.out.-cCompile, but don’t link.-lnameLink with a library. The linker will try to find the library on the system and with the paths provided.-L/path/to/dirTell the linker where to look for additional library.-L.looks in the current dir.-I/path/to/dirTell the compiler where to look for additional headers.-I.looks in the current dir.-DNDEBUGdon’t compile asserts-O3Optimize code for speed, at level 3 (levels run from 1 to 5).-OgOptimize code, but still allow debugging.-O0Do not optimize.-fopt-infoFor GCC compilers: information on which optimizations have been performed.-DnameTurns on a macro.-Dname=valuesets the name of a macro tovalue.-Wallturns on all warnings. Good for learning and perfectionists.
More details can be found by running man gcc on systems with GNU compilers installed.
2.2 Preprocessor directives #
In step 1 above, the compiler first handles all the preprocessor directives: those are the lines in the source starting with #.
Preprocessor directives can be though of as a simple way of “meta programming”: it is the generation of source code through a programming language on a higher abstract level.
Using external files with #include
#
This one is most important. To include another source file use #include "path/to/other.h". The preprocessor just copies the entire other.h source into the line of the #include directive. There is no magic.
Prevent double inclusion with #pragma once
#
Using #include can lead to (accidental) double inclusion. For example, file1.c may include other.h directly, but may at the same time include a file2.h which also includes other.h. In the preprocessed file1.c, the variables and functions from other.h occur twice, leading to compilation errors. To prevent this, add #pragma once to the top of the file that is intended for inclusion: the compiler will ignore the file if it sees it more than once.
Macros are meta-variables, defined with #define
#
A macro is a preprocessor variable. It is often used to enable some functionality during compilation. In the example below USE_PRINT is used to decide whether or not the program should be compiled with the printf() statement.
#define PI 3.1415
#define USE_PRINT

#if PI < 3 || PI > 4
#error
#endif

int main() {
#ifdef USE_PRINT
  printf("pi = PI = %f", PI); // prints "pi = 3.1415 = 3.1415"
#endif
  return 0;
}
When a macro has a value, such as PI here, any occurrence of the text PI in the source is substituted by the value. This is tricky, and should generally be avoided. Macros can be defined with #define (or with -Dname=value during compilation), but can also be deleted with #undef.
Performing checks with an assert()
#
The assert is a conditional check, much like an if statement, that can be disabled by setting the NDEBUG macro (or passing -DNDEBUG to the compiler). If the check fails, the program exits and prints an error.
#include <assert.h>

int main()
{
    unsigned int m = 2 << 5;
    m = m >> 1;
    assert(m == 1 << 5); // this should never fail
    return 0;
}
Asserts should be used as “implementation checkpoints” in code, and are a way of debugging code. In contrast to an if(this fails){ printf("oops"); }, to see if an implementation went south, an assert is easily disabled in the final version of the software. As such it does not affect the performance of the code.
2.3 Header files #
In C and C++ it is common to split source code into two different sorts of files: source files (.c/.cpp) and header files (.h/.hpp). Source files are meant for direct compilation into object files. Header files also contain source code, but are intended to be #included, so they can be reused amongst source files. They are therefore only compiled indirectly.
The distinction between “not-shareable” (source) and “shareable” (headers) has two advantages:
- First, It provides an abstraction. Source files “hide” their implementation to other parts of the project. This makes code easier to understand, and also avoids unwanted reuse of code.
- Secondly, it motivates fast compilation of source code. Since each source file compiles only into a single object file, having “fat” source files and “thin” headers prevents source code being recompiled unnecessarily.
Oftentimes, a good organizational structure is to have pairs of source-and-header files. For example, a foo.c and foo.h. Then split definitions and declarations as follows:
- Source files contain definitions, i.e., the implementation of functions or types.
- Header files contain declarations of the functions and types that are to be shared.
Good to know:
- Headers are allowed to contain any C/C++ source code (except for the
main(), which is not reusable). The.h/.hppextension does not give the file special treatment. - It is good practice to keep headers clean, and document functions in the headers for a reader that does not know the implementation in the source file.
- All header files should start with a line
#pragma once.
C++ example
Declarations in coffee.hpp:
#pragma once

void say_hi(); // function declaration

class Coffee { // class declaration
public:
    Coffee();
    void add_sugar();
    void add_milk();
    virtual double price() const;
protected:
    unsigned nr_sugar_;
    unsigned nr_milk_;
};
Definitions in coffee.cpp that implement the declarations in coffee.hpp:
#include "coffee.hpp"

void say_hi() { // function definition
    std::cout << "hi!";
}

void print_coffee(const Coffee& c) { // not shared via header!
    std::cout << c.price() << std::endl;
}

Coffee::Coffee() // constructor implementation
    : nr_milk_(0), nr_sugar_(0) {}

Coffee::add_sugar() { nr_sugar_++; } // member function implementations
Coffee::add_milk() { nr_milk_++; }

double Coffee::price() const {
    return 2.50
        + 0.20 * nr_sugar_
        + 0.50 * nr_milk_;
}
2.4 Libraries #
A library is a reusable C/C++ component consisting of:
- An object archive – with extension
.a(static), or.so(shared). On Windows the latter have extension.dll, on MacOS.dylib. This is created by combining multiple.ofiles after compilation. - A collection of header files. These contain declarations for the symbols in the object archive.
A library is usedby #include-ing the header files in code, and linking the library at compilation. E.g., to make use of a library called name, add -lname. By convention, the linker searches for a file libname.so or libname.a. If the library is not found on the system, a path to the directory containing libname.so/.a needs to be specified with -L, and/or the path to the header files need to be specified with -I. For example:
cc foo.c foo2.c -lbar -lbaz -I/bar/and/baz/include -L/bar/and/baz/lib -o foo
There are three common classes of libraries:
- Static libraries, which are build directly into the executable during compilation. The compiler resolves the location of the static library during compilation.
- Shared libraries (a.k.a. dynamic libraries) are build and stored outside of the executable. Shared libraries are resolved and loaded into memory when an executable starts (remember these missing
.dllfile errors in Windows? Now you know.). Shared libraries avoid that executables become too large and occupy too much of a computer’s memory (RAM), because they can be reused once loaded in memory. - Header-only libraries have no object files. All the code is contained in the headers, and the compilation is thus performed by the user of the library. This has the advantage that the creator of the library doesn’t have to worry for which situations (architectures, optimization settings, etc.) the library will be used.
2.5 Project structure #
It is good practice to divide a project in the following way:
- Library code: write most of the code in one or more (static or dynamic) libraries.
- Application code: small executables that use/test/experiment with your own libraries. These executables can be written with
.cppfiles only, because their functionality does not need to be included by something else.
The advantage of this approach is that the library part of the code becomes reusable for different projects. A possible directory structure is the following:
coffee-project/
├─ src/
│  ├─ coffee.cpp
│  ├─ cookie.cpp
├─ include/
│  ├─ coffee.hpp
│  ├─ cookie.hpp
├─ app/
│  ├─ some_long_computations.cpp
│  ├─ coffee_demo.cpp
│  ├─ a_few_tests_that_I_did.cpp
├─ examples/
│  ├─ show_coffee_price.cpp
│  ├─ compute_cookies.cpp
├─ extern/
│  ├─ some_other_library/
├─ scripts/
│  ├─ python_histogram.py
│  ├─ matlab_plot.m
├─ build/
├─ CMakeLists.txt
Although project structure is opinionated, the directory structure above is fairly common:
srccontains all the library.cppfiles;includecontains all the library.hppfiles;appandexamplecontain some program entry points (containingmain()functions) that make use of the libraries generated fromsrcandinclude;buildcontains all ouput from the compiler.
Of course it is possible have much more involved project structures, depending on the size and needs of the project.
2.6 CMake #
Recommended reads:
- An Introduction to Modern CMake (https://cliutils.gitlab.io/modern-cmake/chapters/basics.html)
- Quick CMake tutorial for CLion (https://www.jetbrains.com/help/clion/quick-cmake-tutorial.html)
CMake is perhaps the most populair build system for C and C++. In short, a build system is responsible for guiding the compilation process, which can be a tedious, especially if compatibility with multiple operating systems is a requirement. The configuration of CMake resides in a CMakeLists.txt file.
1. Compiling #
In CMake, building revolves around compiling targets. A target is either an executable or a library. An executable and a library are added below:
# `coffee_demo` executable
add_executable(coffee_demo "app/coffee_demo.cpp")

# `products` library
add_library(products STATIC "src/coffee.cpp" "src/cookie.cpp")
target_include_directories(products PUBLIC include)
The target_include_directories(...) finds headers in the include/ directory, while building products. For a project’s internal libraries, this directory will usually be include/, but for external libraries it could be something else.
2. Linking #
Each target (executable or library) needs to be linked to the libraries that it depends on. In the above example, there is a coffee_demo executable, and a products library.
- The products library does not depend on anything.
- Most likely, however,
app/coffee_demo.cppwill need an object instance ofclass Coffee, located insrc/coffee.cpp, and thus in the products library. The executable then needs to be linked against the library.
target_link_libraries(coffee_demo PUBLIC products)
Note that, when linking to a library, CMake propagates the headers from products to coffee_demo, thanks to the PUBLIC keyword. So, coffee_demo.cpp is automatically compiled with the headers from the products library, and there is no need for another target_include_libraries(coffee_demo PUBLIC include).
Linking external libraries via the extern folder
To link an external library, there are several approaches. The approach here requires the external library to be a CMake project in the extern directory.
The CMake add_subdirectory(...) builds and imports the targets of a subproject. In this example we assume that there is a chocolatelib directory in extern, containing a target chocolate. This target may then be linked to our products target.
add_subdirectory("extern/chocolatelib") # contains a target `chocolate`
target_link_libraries(products PUBLIC chocolate)